Tomatoes are one of the most rewarding crops a beginner can grow, but they do have specific needs that trip up first-timers. Soil pH, variety choice, and consistent watering matter far more than most gardening guides admit upfront.
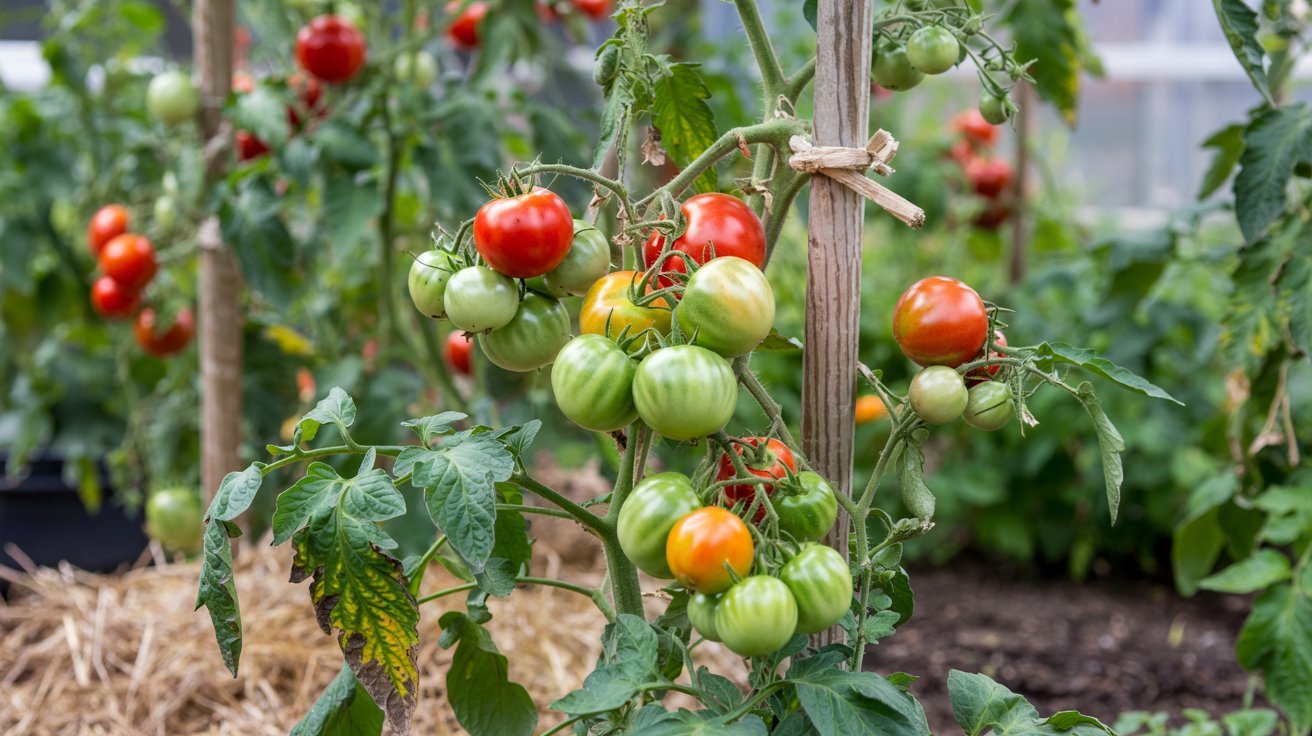
Get those three right, and you'll harvest ripe fruit from a single plant all summer long.
Growing tomatoes from seed or transplant takes 10–18 weeks from start to harvest, depending on variety. Start seeds indoors 6–8 weeks before last frost, maintain soil pH 6.0–6.8, and water 1–2 inches per week.
Indeterminate varieties need staking and regular sucker removal; determinate types are more hands-off.
What You Need Before You Start?
Having the right gear on hand before seeds go in the ground saves you from making substitutions that slow growth. Most of these items are available at any garden center.
Remember it later
Planning to try this recipe soon? Save it for a quick find later!
- Seed trays or 3-inch pots: Use individual cells or small pots to minimize root disturbance at transplant time.
- Seed-starting mix: A sterile, soilless mix drains fast and resists damping-off fungus - never use garden soil indoors.
- pH test kit plus amendments: Pick up lime to raise pH or elemental sulfur to lower it; Solanum lycopersicum wants 6.0-6.8.
- Tomato cages or 6-8 ft stakes with twine: Cages suit determinate varieties; tall stakes handle indeterminate vines that reach 6 feet or more.
- Balanced fertilizer (5-10-10): Higher phosphorus supports root development and early fruiting rather than leafy growth.
- Mulch (2-3 inches): Straw or shredded bark stabilizes soil moisture and blocks soil splash that spreads early blight spores.
- Pruning shears and garden gloves: Clean cuts when removing suckers reduce disease entry points on the stem.
Soak seed trays from the bottom rather than overhead watering. It prevents disturbing tiny seeds and keeps surface moisture even — both matter during the 5–10 day germination window.
Picking the Right Variety First
Variety selection is the decision that shapes every other choice you make - spacing, staking, harvest timing, and how much daily attention the plant needs. Two categories define the field.
- Determinate (bush) varieties: Plants like 'Roma' and 'Celebrity' stop growing at 3-4 feet, set all their fruit within a 2-3 week window, and rarely need pruning. Good for small spaces or canning.
- Indeterminate (vining) varieties: 'Brandywine,' 'Sungold,' and 'Cherokee Purple' keep growing all season, producing fruit continuously until frost. They need tall stakes and regular sucker removal.
- Disease-resistant codes: Letters like V, F, N, and T on a seed packet indicate resistance to verticillium wilt, fusarium, nematodes, and tobacco mosaic virus - worth prioritizing for first-time growers.
- Days to maturity: Short-season varieties (55-65 days) suit zones 3-5 where summers are brief; long-season types (80-90 days) work in zones 7-10 where heat lingers into October.
Limit yourself to 1-3 varieties your first season. Growing fewer plants well beats managing a dozen poorly.
Growing Tomatoes Step by Step
Each step below builds on the last. Skipping the hardening-off phase, for example, undoes weeks of careful seed starting in a single cold night.
Watering and Feeding Through the Season
Tomatoes don't forgive erratic watering. Going from dry to drenched causes the cell walls of developing fruit to expand too fast, which splits skin and triggers blossom end rot even when calcium is present in the soil.
Consistent moisture is the goal - not daily light sprinkles, but deep, infrequent watering that pushes roots downward. In similar ways to how growing peppers rewards a steady irrigation schedule, tomatoes respond dramatically to even moisture throughout the fruiting stage.
- Weeks 1-3 after transplant: Water every 2-3 days, roughly 1 inch per session, to encourage deep root establishment.
- Flowering stage: Maintain 1-2 inches per week total; reduce frequency but increase volume per session to push roots deeper.
- Fruiting stage: Consistent 1-2 inches per week is critical; any dry spell followed by heavy rain splits fruit and triggers end rot.
- Fertilizing: Stop all nitrogen-heavy feeding once the first fruits are marble-sized - excess nitrogen at this stage grows foliage, not tomatoes.
Overhead sprinkler irrigation after flowers open can wash away pollen and prevent fruit set entirely. Drip lines or soaker hoses solve this without any extra cost over a full season.
Feeding the Soil, Not Just the Plant
Most beginner problems with tomatoes trace back to soil conditions set months before the first seedling goes in the ground. Amending soil is faster and cheaper than diagnosing problems in July.
Compost is the single most effective soil amendment for tomatoes - it improves drainage in clay, adds water retention in sand, feeds beneficial microbes, and buffers pH swings. Work 2-4 inches of compost into the top 12 inches of soil before planting.
For gardeners also growing drought-tolerant species nearby, keep in mind that tomato beds need far richer organic matter than most ornamentals.
| Soil Problem | Amendment | Application Rate |
|---|---|---|
| Heavy clay | Compost + gypsum | 4 in. compost + 1 lb/10 sq ft gypsum |
| Sandy/fast-draining | Compost + peat | 4–6 in. compost worked in deeply |
| pH below 6.0 | Dolomitic lime | 5–10 lbs per 100 sq ft; retest after 3 weeks |
| pH above 7.0 | Elemental sulfur | 1–2 lbs per 100 sq ft; works slowly over weeks |
Test pH every season, not just once. Heavy rainfall leaches calcium and raises acidity over time, and a pH below 6.0 locks out calcium even if it's physically present in the soil.
Problems Beginners Hit and How to Fix Them
Three issues account for the majority of failed first-season tomato crops. All three are preventable if you know the trigger.
- Blossom end rot: Dark, sunken patches on the bottom of fruit signal calcium deficiency - usually caused by inconsistent watering or low pH rather than absent calcium. Fix soil pH to 6.2-6.8 and maintain even moisture; foliar calcium sprays are a temporary patch, not a cure.
- Leggy, weak seedlings: Stretching toward insufficient light is the cause, not genetics. Move trays to within 2-4 inches of a grow light providing 2,500-5,000 lux for 14-16 hours daily. Starting seeds more than 8 weeks early indoors compounds this problem.
- Early blight or Septoria leaf spot: Yellow leaves with brown spots, starting low on the plant, mean fungal disease has taken hold. Remove affected lower leaves immediately, switch to drip irrigation, and apply a copper-based fungicide every 7-10 days. Proper lawn and yard drainage around the bed also reduces ambient moisture that feeds these pathogens.
Septoria leaf spot overwinters in crop debris. Clear all dead tomato foliage and stems from the bed in fall, and rotate your tomato plot to a different spot each year to break the disease cycle.

Zone-by-Zone Timing Adjustments
Tomato timing shifts significantly depending on your climate. A single planting date doesn't work across USDA zones 3-10.
- Zones 3-4: Last frost often falls in late May or early June. Start seeds indoors in late March, use black plastic mulch to warm soil, and choose short-season varieties like 'Siletz' or 'Stupice' (55-65 days). Row covers extend the season by 2-3 weeks on both ends.
- Zones 5-6: Last frost typically mid-April to mid-May. Start seeds in late February to early March. Most standard varieties (70-80 days) work well here.
- Zones 7-8: Two tomato seasons are possible - spring transplants go in March, a second planting in late July for fall harvest. Avoid transplanting during heat spikes above 95°F, which drops pollination rates.
- Zones 9-10: Summer heat often exceeds optimal fruit-set temperatures (55-85°F overnight lows). Grow heat-tolerant varieties like 'Solar Fire' or 'Heatmaster' and expect a midsummer slowdown. Fall is the best production window in these zones.
In zones 3–4, soil temperature at planting depth matters more than air temperature. Use a soil thermometer — tomato roots stall below 60°F even if daytime air is warm. Black plastic mulch can raise soil temp by 8–10°F in two weeks.
What to Do Between Flowers and First Harvest?
The stretch from first flower to ripe fruit - typically 45-85 days depending on variety - is when most beginners either over-intervene or stop paying attention. Both cause problems.
This mid-season window is specific to tomatoes in a way most other garden crops don't replicate.
Flowers dropping without setting fruit is a common mid-season complaint. Temperatures above 85°F or below 55°F during bloom cause pollen to become nonviable.
You can't fix the weather, but you can gently shake flower clusters by hand or with an electric toothbrush on still, hot mornings to mechanically transfer pollen - the same technique used in getting full seed set on large-headed plants.
- Green fruit stage: Keep watering consistent and resist the urge to fertilize heavily - the plant is allocating energy to fruit development, and extra nitrogen now pushes leaf growth instead.
- Color break stage: Once fruit begins shifting from green to its mature color, you can pick it and ripen indoors at 65-70°F. This frees the plant to push more energy into remaining fruit and reduces losses from splitting or pest damage.
- End of season: When nights drop below 50°F consistently, pick all mature green tomatoes and ripen them on a countertop away from direct sun. Don't refrigerate - cold destroys the volatile compounds that make homegrown tomatoes taste different from store-bought ones.
Sunflowers and tall zinnia varieties make useful companion plantings near tomatoes, attracting pollinators that improve fruit set during the critical bloom window.
For gardeners also growing fruit, strawberry beds pair well spatially with tomatoes since they occupy different vertical space and share similar pH requirements around 6.0-6.5.
Ornamental beds nearby benefit from this same mid-season attention rhythm. Gardens with structure - like shrub roses used as border plantings - create windbreaks that reduce stress on staked tomato plants during summer storms.
For gardeners building out a full edible and ornamental yard, pairing high-maintenance crops like tomatoes with lower-effort perennials keeps the workload manageable. Perennial lavender types planted nearby also repel certain aphid populations that vector tomato mosaic virus in warmer climates.
If you're working with formal hedges close to your vegetable beds, note that boxwood root zones compete aggressively for moisture in shared soil and can undermine consistent tomato irrigation within 3-4 feet.
Maintaining lavender plants near garden edges provides a low-water buffer zone between formal hedging and irrigated vegetable beds.
Frequently Asked Questions
Count back 6–8 weeks from your last expected frost date — in zone 5, that typically means starting seeds in late February to early March, aiming for transplant around mid-May.
The most reliable fix is correcting soil pH to 6.2–6.8 and watering consistently at 1–2 inches per week, since irregular moisture prevents calcium uptake even when calcium is present in the soil.
Tomatoes need a minimum of 6–8 hours of direct sun daily; fewer than 6 hours significantly reduces fruit set, and varieties like 'Sungold' or 'Cherokee Purple' underperform noticeably below that threshold.
Only prune suckers on indeterminate varieties like 'Brandywine' or 'Sungold'; removing suckers from determinate types like 'Roma' reduces yield because those side shoots carry the majority of the fruit load.
Yes — use a minimum 5-gallon container per plant for determinate types, or a 15–20 gallon pot for indeterminate varieties, and expect to water daily in summer since containers dry out twice as fast as in-ground beds.
Pin it for your next how to grow tomatoes: complete beginner guide project.