Growing potatoes at home is one of the most satisfying things you can do with a patch of soil - or even a large bag on a patio.
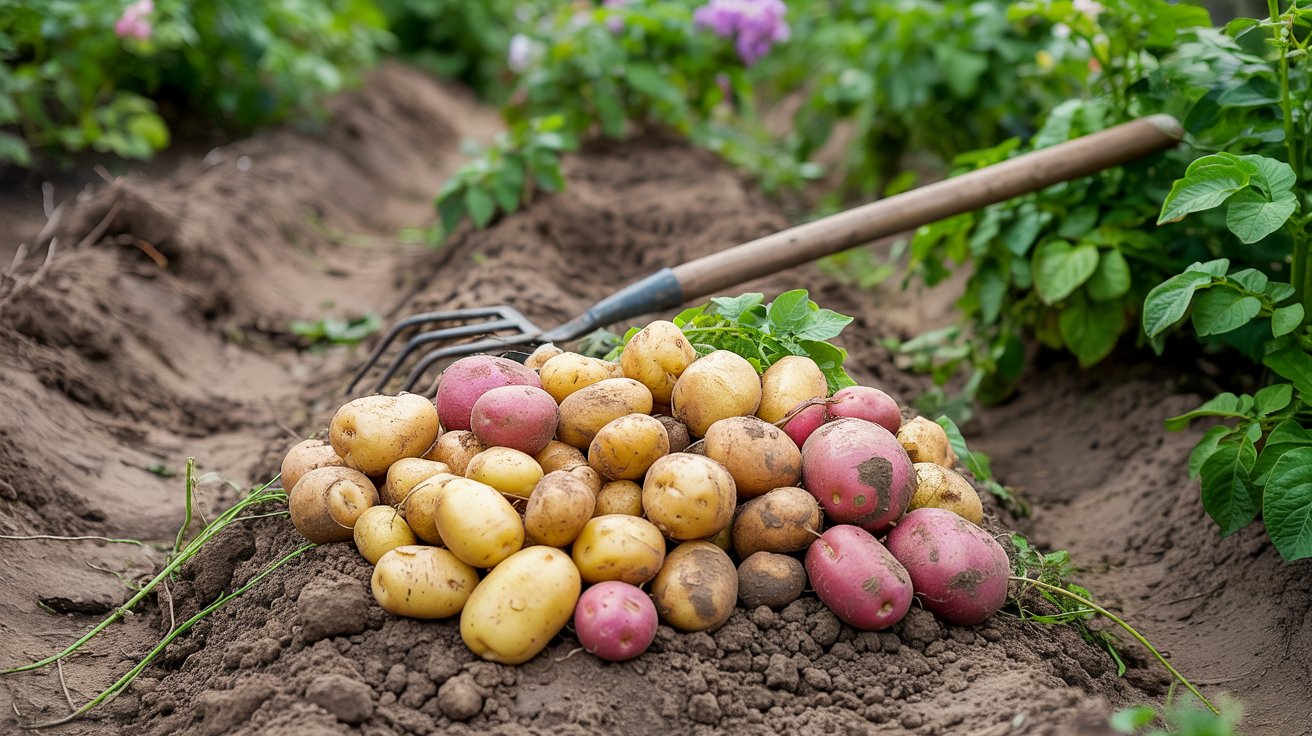
You plant a handful of seed potatoes in spring and dig up a bucket of food a few months later.
Potatoes grow from seed potatoes planted in spring, once soil hits 45°F. They need loose, well-drained soil, consistent moisture, and regular hilling to produce a big yield.
Early varieties are ready in 70 days; main-crop types take up to 120.
How to Grow Potatoes Step by Step?
Start with certified seed potatoes, not grocery store spuds. Grocery potatoes are often treated to prevent sprouting, and they can carry disease.
Remember it later
Planning to try this recipe soon? Save it for a quick find later!
Certified seed potatoes are disease-free and bred specifically for planting.
You can find seed potatoes at garden centers or order them online in late winter. Many suppliers carry dozens of varieties, from waxy salad types to floury baking potatoes.
Use straw mulch instead of soil for hilling in hot climates. Straw insulates tubers from heat, retains moisture, and makes harvest day much easier — just pull it aside and collect your potatoes.
Picking the Right Variety for Your Garden
Variety selection determines yield, flavor, and how long you wait for harvest. Early varieties like Yukon Gold and Red Norland mature in 70-80 days, which matters a lot in short-season gardens.
Main-crop types like Russet Burbank and Kennebec take 100-120 days but store better through winter.
- Yukon Gold: Early variety, matures in 70 days, buttery flavor - excellent for boiling and roasting.
- Red Norland: Another early type, red-skinned and waxy, holds shape well in salads and soups.
- Kennebec: Mid-season, high-yielding, good disease resistance - a reliable main-crop choice for most zones.
- Russet Burbank: The classic baking potato, best in zones 4-7 where summers stay moderate.
- French Fingerling: Late variety, small nutty tubers - low yield but high flavor, worth growing if you have space.
Just like when you plant garlic in fall, matching variety to your local frost dates matters more than any other single choice. Check your seed supplier's days-to-maturity against your last and first frost dates before buying.
In zones 3–5, stick with early varieties (70–85 days) to guarantee harvest before fall frost. Zones 6–8 can grow both early and main-crop types. In zones 9–10, plant in late winter for a spring harvest — summer heat shuts down tuber formation.
Growing Potatoes in Bags and Containers
Container growing works well, especially on patios or in gardens with heavy clay soil. Grow bags - fabric pots of 10-25 gallons - outperform plastic buckets because roots breathe better and soil doesn't overheat as quickly.
This matters because tubers stop forming once soil temperature exceeds 80°F.
Unlike container strawberries, which stay compact, potatoes need vertical room. The key to container success is starting with just 6 inches of mix, then adding more as the plant grows - mimicking hilling in a confined space.
- Container size: Use at least 10 gallons per 2-3 seed potatoes. Crowding reduces yield fast.
- Soil mix: Use 50% compost, 50% topsoil or potting mix. Pure potting mix dries out too quickly.
- Watering frequency: Containers dry out faster than beds - check moisture every day in summer, water when the top 2 inches feel dry.
- Harvest method: Tip the whole bag on its side and sort through the mix with your hands. No digging required.
Grow bags are reusable for 3–4 seasons before the fabric degrades. Rinse them with a dilute bleach solution between crops to kill any lingering blight spores.
Pests and Diseases That Hit Potato Crops Hard
Two problems kill more home potato crops than anything else: Colorado potato beetle and late blight. Knowing what to look for early makes the difference between a full harvest and a total loss.
The Leptinotarsa decemlineata, or Colorado potato beetle, is a striped yellow-and-black beetle that lays orange egg clusters on leaf undersides. Larvae skeletonize plants fast.
Check plants every few days from June onward and crush egg masses on sight. Spinosad-based sprays work well on larvae if populations get ahead of you.
Potatoes and tomatoes grown nearby share several of the same insect pests, so monitor both together.
Late blight - caused by Phytophthora infestans, the same pathogen behind the Irish famine - moves fast in cool, wet weather. Watch for brown water-soaked spots on leaves that spread within 48 hours.
Remove and bag affected foliage immediately; do not compost it.
- Colorado potato beetle: Hand-pick adults and crush egg masses weekly. Use row cover early in the season to prevent adults from landing.
- Late blight: Avoid overhead watering, improve air circulation by spacing plants properly, and choose resistant varieties like Sarpo Mira.
- Scab: Caused by soil bacteria in high-pH soil. Keep pH below 6.5 and avoid adding lime near potato beds.
- Wireworm: Thin yellow larvae tunnel into tubers. Rotate crops - don't plant potatoes where grass grew in the previous year.
4 Mistakes That Cut Your Yield in Half
Most yield problems in home potato growing trace back to a few consistent errors. Fixing these alone can double what you dig up in fall.
- Skipping hilling: Exposed tubers turn green and produce solanine - a bitter, mildly toxic compound. Hill every 2-3 weeks without fail, burying the lower stem each time.
- Overwatering early, underwatering late: Waterlogged soil causes rot before the plant establishes. Then gardeners back off watering just when tubers are bulking up post-flowering - cutting yield significantly. Keep moisture consistent from flowering to harvest.
- Planting too early in cold soil: Seed potatoes planted in soil below 45°F sit dormant and rot rather than sprout. Use a soil thermometer - not just the calendar - to time planting. This is especially important when starting heat-loving crops alongside potatoes in spring.
- Ignoring crop rotation: Replanting potatoes in the same spot year after year builds up soilborne disease and beetle populations. Move your potato bed to a different location every season - a 3-year rotation is ideal.
Never eat green potatoes or any tuber with green patches. The solanine produced when tubers are exposed to light can cause nausea and should not be cooked off. Cut away all green areas deeply or discard the potato entirely.
Curing and Storing Your Harvest
How you handle potatoes after digging determines how long they last. Rushing them into storage without curing leads to thin-skinned tubers that bruise, shrivel, and rot within weeks.
Curing toughens the skin and heals small cuts made during harvest.
Spread freshly dug potatoes in a single layer somewhere dark, humid (85-95% humidity), and warm (60-65°F) for 10-14 days. A basement corner or garage works well in early fall.
Once cured, move them to a cooler spot - ideally 38-45°F - where they'll keep for 4-8 months depending on variety.
- Do not wash before storage: Excess moisture on the skin causes rot. Brush off loose soil with your hands or a dry cloth only.
- Store in the dark: Even low light triggers greening in storage. Use paper bags, cardboard boxes, or burlap sacks.
- Check regularly: One rotting potato spreads ethylene gas that accelerates decay nearby. Remove any soft or discolored tubers immediately.
- Keep away from apples: Apples produce ethylene that causes potatoes to sprout early. Store them in separate areas of the basement.
For year-round garden structure, pair your vegetable garden planning with perennial plantings - but your potato storage timeline should run independently from seasonal garden cleanup.
Fingerling and early varieties store for 2-3 months at best. Russet and Kennebec types, properly cured, can last through March.
If you're growing primarily for long-term storage, stick to main-crop varieties with thick skins.
Some gardeners save their own seed potatoes from the harvest - setting aside small, healthy tubers from disease-free plants. This works for one or two seasons, but late-season planting decisions like this carry over virus loads over time.
Buy fresh certified stock every 2-3 years to reset disease risk.
If you have space to reduce water-intensive crops elsewhere in the garden, redirecting that irrigation capacity to your potato bed during tuber bulking pays off directly in harvest size.
Container-grown potatoes don't cure the same way. Harvest them promptly once foliage dies back and use those tubers within 4-6 weeks, as grow bag soil doesn't harden the skin the way in-ground clay loam does.
The plants that do well in lower-light corners of your garden make good candidates for interplanting around your potato rows - just avoid anything in the nightshade family, which shares diseases. Basil, marigolds, and low-growing herbs work well nearby without competing for resources.
Finally, keep a simple harvest log: variety planted, date, depth, and yield in pounds. One season's notes will tell you more about what works in your specific soil and zone than any general guide.
Gardeners who track specific plant performance year over year consistently outperform those who start from scratch each spring.

Frequently Asked Questions
In zone 5, plant seed potatoes from late April to mid-May once soil reaches 45°F — typically 2–3 weeks before your last frost date, around May 15.
Yes, fabric grow bags of at least 10 gallons work well for 2–3 seed potatoes each, producing 3–5 pounds per bag under good growing conditions.
Plant seed potatoes 4 inches deep initially, then hill soil up around the stem every 2–3 weeks until the mound reaches 8–10 inches above the original soil line.
A 5-10-10 balanced fertilizer applied at planting and again when plants reach 8 inches gives potatoes the phosphorus and potassium they need without excess nitrogen pushing leaf growth over tuber development.
Properly cured main-crop varieties like Kennebec and Russet Burbank last 4–8 months at 38–45°F in the dark; early varieties like Yukon Gold store for only 2–3 months.
Pin it for your next how to grow potatoes at home project.