Dividing perennials is one of the fastest ways to get more plants for free - and to rescue a clump that's gone woody, crowded, or bloom-shy. Most divisions take 8-10 minutes per clump, and when you time it right and water well afterward, more than 80% of divisions root and recover without drama.
This guide gives you the exact steps, the right months by plant, and the fixes for the mistakes that kill divisions before they ever get started.
Divide most clumping perennials in early spring (new growth 1–3 in tall) or early fall (6–8 weeks before hard freeze). Use a spade, fork, pruning saw, or sharp knife.
Expect 4–8 weeks recovery; space divisions 12–48 in apart depending on species. Shade and water for the first two weeks to protect exposed crowns.
Quick, Do-It-Now Method: Divide Most Perennials in 8 Steps
This sequence works for the vast majority of clumping perennials, from hostas to ornamental grasses. Follow the order - skipping steps like prepping the new hole first is the most common cause of divisions drying out and dying.
Remember it later
Planning to try this recipe soon? Save it for a quick find later!
Every division needs at least one healthy growing point (eye, bud, or fan) AND intact feeder roots. A big piece with no active growth point won't recover, no matter how well you water it.
When to Divide: Month-by-Month Timing and Why It Matters?
Perennials divide best when soil temperatures are moderate and the plant isn't carrying a full canopy of leaves demanding water. Two windows hit those conditions: early spring (new shoots 1-3 in, March-May depending on zone) and early fall (6-8 weeks before first hard freeze, roughly August-October).
Spring divisions have a full growing season to establish; fall divisions need enough warm weeks to root before dormancy.
Avoid dividing during peak summer heat or drought - high transpiration stress combined with root damage is a combination most plants won't recover from quickly. Bloom time is also the wrong moment; the plant's energy is fully committed to flowering, not root regeneration.
| Plant | Best Time to Divide | Spacing After Division |
|---|---|---|
| Hosta | Early spring (shoots 1–3 in) or early fall | 24–48 in |
| Daylily | Mid-to-late summer after bloom, or early fall | 18–24 in |
| Aster | Early spring | 18–24 in |
| Sedum (tall) | Early spring | 18–24 in |
| Peony | Early fall (Sept–Oct) | 36–48 in |
| Bearded Iris | Mid-summer, 4–6 weeks after bloom | 12–18 in |
The University of Minnesota Extension recommends dividing most perennials every 3–5 years to maintain vigor — earlier if the center of the clump dies out or flowering drops off noticeably.
Plant-Specific Notes: Hostas, Daylilies, and Other Common Perennials
The 8-step method holds for all of these, but each plant has one or two quirks that make the difference between a clean recovery and a slow decline. These notes are the adjustments - not a repeat of the main process.
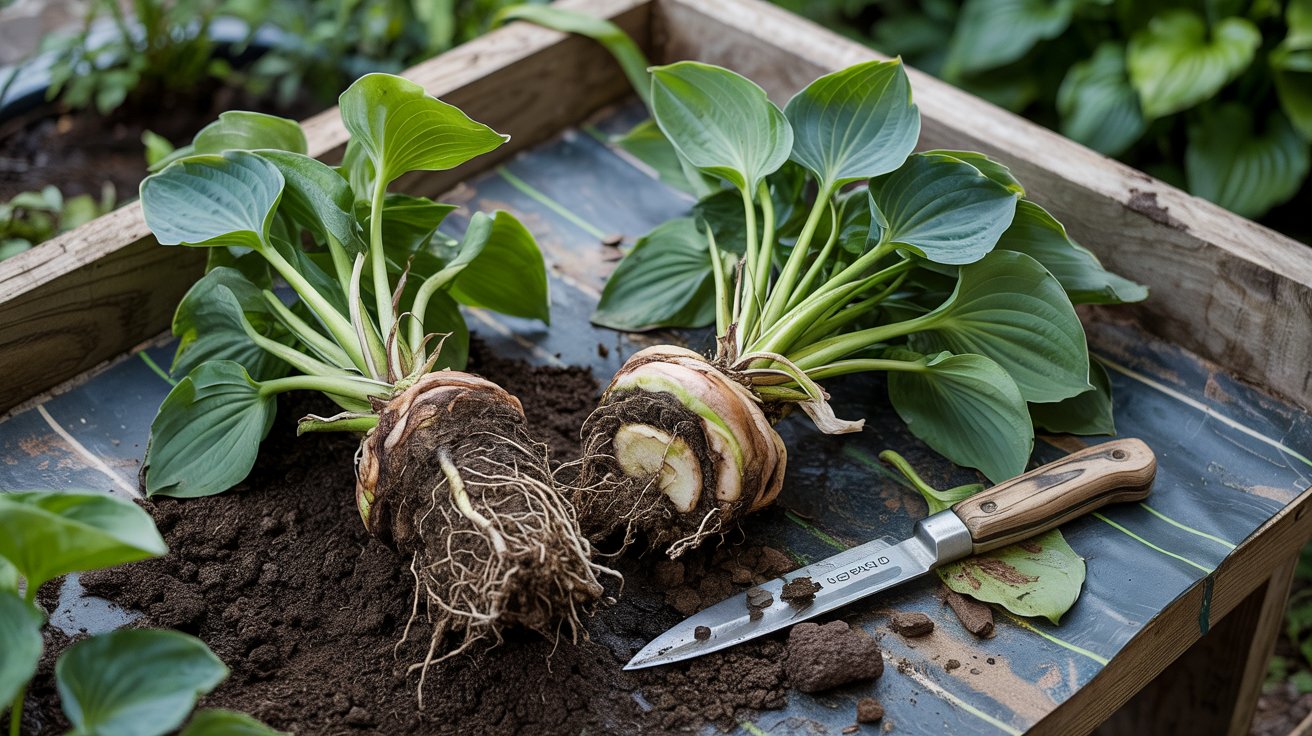
Hostas have tight, fleshy crowns that don't pull apart by hand once mature. You can choose hosta varieties that stay compact and need dividing less often, but when the time comes, a sharp knife is non-negotiable.
Divide into pieces with 2-4 eyes (growing points); spring is best because the rolled shoots make eyes easy to count.
When dividing hostas, rinse the crown with a hose after lifting — soil falls away and the eyes become clearly visible, so you cut in exactly the right place without guessing.
Daylilies (Hemerocallis spp.) separate into individual fans of leaves; aim for 3-6 leaves per fan. Always remove the dead, woody center section of an old clump - replanting it just wastes a hole, and the rotted tissue can spread disease to healthy fans.
| Plant | Division Size | Key Tweak |
|---|---|---|
| Hosta | 2–4 eyes per piece | Use sharp knife; divide in spring when eyes visible |
| Daylily | 3–6 leaf fans | Discard dead woody center; reduces rot risk |
| Aster | 3–5 shoots with roots | Divide annually in spring to prevent center die-out |
| Sedum | Rooted stem sections | Very forgiving; divisions root even without eyes present |
| Peony | 3–5 eyes per division | Plant eyes 1–2 in below soil; no deeper or blooms fail |
| Bearded Iris | Rhizomes under 8 in long, ~1 in thick | Divide every 3–4 years; discard old back sections |
Peonies are rarely divided and resent it - healthy peony plants can bloom for 50+ years undisturbed. Only divide when clumps are genuinely overcrowded or you need a new plant.
Each division needs 3-5 eyes and eyes must sit just 1-2 in below the soil surface; planting deeper is the number one reason peonies refuse to flower.
Bearded iris rhizomes creep outward and the back center section becomes exhausted after 3-4 years. Keep only new outer rhizomes under 8 in long; trim fans to 6 in tall and replant before fall bloomers fill the bed.
Prep, Planting, and Spacing Rules
These are the decisions made at planting time that determine whether a division settles in or sulks. Getting the crown depth and the first watering right matters more than any fertilizer you add later.
For other propagation methods, the prep principles are similar but root depth is even more critical here.
- Amend heavy clay with up to 20% compost by volume mixed into the backfill - improves drainage without creating an abrupt soil interface.
- Match the original depth when setting divisions - crown at or just above soil level for most perennials.
- Apply 1-2 in of mulch after planting, keeping it 1-2 in clear of the crown to allow airflow.
- Saturate immediately with 0.5-1 in of water; then water weekly if no rain falls during the first month.
- Space generously - hostas need 24-48 in, daylilies 18-24 in; crowded divisions just need dividing again sooner.
- Burying the crown - even 1-2 in too deep causes crown rot in hostas, peonies, and iris within weeks.
- Fertilizing at planting - high nitrogen pushes top growth before roots are ready, causing rapid wilt.
- Planting into dry soil - water the hole before you plant, not just after; dry backfill pulls moisture out of the division.
- Skipping labels - unmarked divisions of similar-looking plants get moved or discarded accidentally within a season.
Aftercare and Troubleshooting: Watering, Fertilizing, and Recovery
The first two weeks are when divisions are most vulnerable. Roots haven't knit into the surrounding soil, so the plant is entirely dependent on you for moisture.
Getting your garden ready for spring well before you divide means amended beds, mulch on hand, and no digging surprises.
Keep divisions in bright shade for the first 7-14 days. Direct sun on a plant with a compromised root system accelerates wilting faster than additional watering can compensate.
After two weeks, gradually remove shade cloth over 3-4 days rather than pulling it all at once.
If a crown feels soft or smells rotten within 10 days of planting, you have crown rot — likely from planting too deep or overwatering in heavy clay. Remove and discard all infected tissue immediately; do not compost it. Treat the remaining soil with a copper-based fungicide before replanting.
Slow wilting without mushy tissue usually means the division needs more water or temporary shade - not that it's dying. Check soil moisture 2 in below the surface before assuming failure.
30-day check: roots anchored, no wilt = on track. 60-day check: new leaf growth visible = established. 90-day check: if still no new growth, lift carefully and inspect roots — replant with improved drainage if roots are pale but firm.
Hold off on fertilizing until 6-8 weeks after planting. At that point, a light application of balanced 10-10-10 granular fertilizer encourages steady growth without burning young roots.
Skip fertilizer entirely if the plant is already putting out new leaves on schedule. You can also deadhead flowers on first-year divisions to redirect energy to root development.
Tools, Supplies, and Quick Shopping List
Having everything at the planting site before you lift a single clump means divisions spend the minimum time exposed to air and drying wind. The required tools cover every division scenario; the optional items speed recovery and cut rebuying on future projects.
For beds that also contain low-light perennials, a hand trowel is worth adding for tight spaces.
| Category | Item | Purpose |
|---|---|---|
| Required | Digging spade | Lifting full rootballs cleanly |
| Required | Garden fork | Loosening and teasing apart fibrous roots |
| Required | Sharp knife or pruning saw | Cutting tight crowns and thick rhizomes |
| Required | Gloves | Hand protection from sharp rhizomes and soil |
| Optional | Root hormone powder | Speeds root development on slow-rooting species |
| Optional | Compost or topsoil | Soil amendment for replanting holes |
| Optional | Mulch (bark or straw) | Moisture retention after planting |
| Optional | Plant labels + marker | Identify divisions through the growing season |
For identifying hosta varieties before dividing, photograph the parent plant's leaf pattern - labels alone won't capture color or variegation for future reference. A waterproof marker on plastic labels outlasts one full season without fading.

Frequently Asked Questions
Early spring (shoots 1–3 in tall) and early fall (6–8 weeks before hard freeze) are the two reliable windows. Avoid mid-summer heat, which pushes transplant stress beyond what most roots can handle.
Most hostas need dividing every 4–5 years. Small or slow-growing varieties may never need it; divide when the clump crowds neighbors or the center loses vigor and leaf size drops noticeably.
Yes — mid-to-late summer right after bloom is actually the recommended window for daylilies. They need at least 6 weeks of warm soil before frost to re-establish feeder roots before dormancy.
Avoid it if possible. If you must divide during dry conditions, water the parent clump deeply 24 hours beforehand and plan to water the new divisions daily for the first two weeks instead of weekly.
No — skip fertilizer at planting. Wait 6–8 weeks, then apply a light dose of balanced 10-10-10 only if new growth is slow. Early fertilizing pushes leaves before roots are ready to support them.
Pin it for your next how to divide perennials project.