Taking a cutting from a favorite plant and watching it grow roots is one of the most satisfying things you can do as a gardener. It costs almost nothing, requires no special equipment, and turns one healthy plant into many.
The process works because stem tissue contains meristematic cells that, under the right conditions, generate new roots. Give those cells warmth, moisture, and indirect light, and they do the rest.
Most beginners worry they'll get the technique wrong. The reality is that rooting success depends more on timing and cleanliness than on expensive products or complicated setups.
This guide covers everything from taking the first cut to potting up a rooted cutting - including both soil and water-rooted pothos results that prove the method works across dozens of species.
Whether you're working from a windowsill or a dedicated propagation shelf, the same framework applies to houseplants, herbs, and perennials alike.
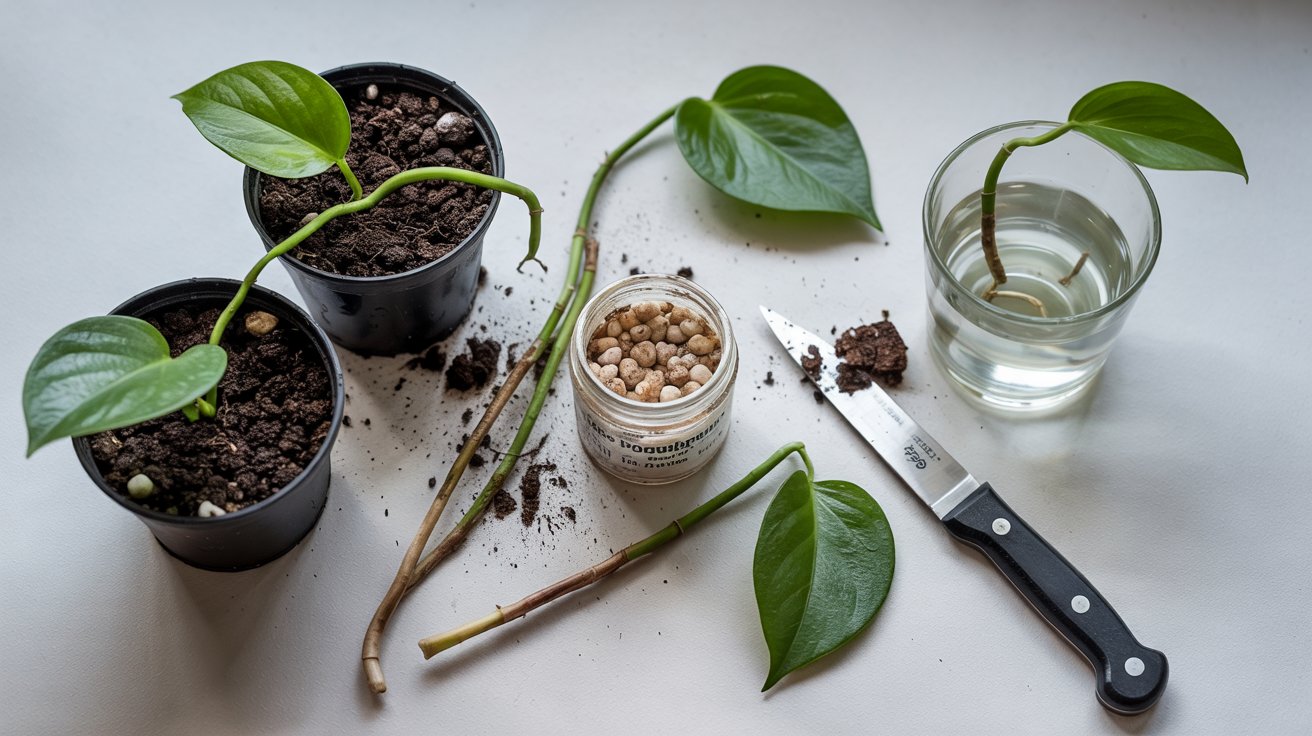
Propagating plants from stem cuttings is a low-cost method that produces rooted new plants in 2–8 weeks. Take a 4–6 inch cutting with 2–3 nodes, place it in water or moist soil, and keep it warm and humid until roots form.
The Complete Propagation Path
Propagating from cuttings means removing a healthy stem section from a parent plant and encouraging it to form its own root system.
Remember it later
Planning to try this recipe soon? Save it for a quick find later!
You have two main media to choose from: water, which lets you watch root development directly, or moist soil, which produces roots adapted to growing conditions from day one.
Before you make a single cut, gather your materials. You'll need sharp, clean scissors or pruners, a clean container, well-draining potting mix (if going the soil route), fresh water, and optionally, a rooting hormone powder or gel.
According to Iowa State propagation guidance, a reliable cutting is 4-6 inches long with 2-3 nodes present.
The Penn State propagation timeline puts rooting at 2-8 weeks depending on species and cutting quality. Faster-rooting plants like pothos or impatiens can show roots in under two weeks, while woody stems like rosemary may need the full eight.
The full cycle from cutting to an established plant in its own pot typically runs six to twelve weeks. Spending time now on clean tools and healthy parent selection saves troubleshooting time later.
Taking, Trimming, and Rooting Stem Cuttings
The parent plant matters as much as the technique. Choose a stem that is firm, green, and actively growing - not wilting, diseased, or currently in bloom.
Flowering stems redirect energy to blooms rather than roots, so snip those off or pick a vegetative stem instead.
Make your cut at a 45-degree angle just below a node, which is the small bump where leaves attach. This angle increases the surface area exposed to rooting medium and prevents water from pooling on a flat cut.
The RHS propagation techniques guide recommends using rooting hormone specifically for difficult or woody cuttings, following product directions for whether to dip or dust.
Fresh wood roots far more reliably than old growth. Missouri Botanical Garden's indoor propagation basics note that stems no more than one year old give the best results - older, woody sections often root too slowly or not at all.
Once roots have formed and the cutting resists a gentle tug, you can begin thinking about potting up rooted cuttings into their permanent containers. Good sanitation at every stage - clean tools, fresh mix, rinsed jars - is the single biggest variable you can control.
Never take cuttings from a plant that shows signs of pest infestation or disease. Propagating a sick plant just multiplies the problem — wait until the parent is fully healthy before cutting.

Water Propagation and Rooting Hormone: Two Paths to Roots
Water propagation is exactly what it sounds like: you place the stripped cutting in a jar of water and wait. Use a clear container so you can monitor root development without disturbing the cutting.
Submerge 1-2 nodes but keep foliage above the waterline.
Refresh the water every 5-7 days to prevent bacterial buildup. Most cuttings begin forming visible root tips within 2-6 weeks in water, as confirmed by Missouri Botanical Garden's propagation resource.
Easy-to-root species like monstera propagation success is commonly achieved this way.
Soil propagation works differently. The cut end is treated with rooting hormone (optional but useful for slower rooters), then inserted into a moist, well-draining mix - a blend of perlite and potting soil works well.
The RHS root cuttings guide confirms that rooting hormone in soil often shortens rooting time and improves survival rates for difficult species.
Both paths work. Water propagation suits beginners who want visual feedback.
Soil propagation produces roots that are already adapted to growing media, which often means less transplant shock and faster establishment. Fast-growing herbs like mint cuttings root reliably in either water or soil within two weeks.
Temperature and humidity matter regardless of method. Keep cuttings at 65-75°F and away from cold drafts.
Consistent warmth is more important than occasional bright light.
Cover soil-propagated cuttings with a clear plastic bag to trap humidity. This simple cloche can raise local humidity by 20–30% without any equipment purchase.
Adaptable Setups and Common Pitfalls
You don't need a greenhouse. A kitchen counter, bathroom shelf, or north-facing windowsill all work as propagation stations.
Bright indirect light is the target - avoid direct sun, which scorches tender cuttings and dries soil too fast. Missouri Botanical Garden specifically advises against harsh direct sun during rooting.
Humidity is the factor most beginners underestimate. The high humidity peace lilies prefer mirrors what cuttings need: 60-80% relative humidity at around 65-75°F supports rooting for most common houseplants.
Reused glass jars, a tray of pebbles with water, or a simple plastic bag cloche all raise local humidity at zero cost.
In dry climates or during winter heating season, indoor humidity can drop well below 40%. A small humidifier near your propagation area or a loose plastic bag tent can keep cuttings from desiccating before roots form.
- Overwatering soil cuttings: Keep mix moist but not soggy. Waterlogged soil promotes rot at the cut end before roots can form.
- Direct sun exposure: Cuttings have no roots to replace water lost through leaves. Direct sun causes rapid wilting and failure.
- Using stressed parent plants: A plant that is underwatered, pest-infested, or recently repotted produces weaker cuttings with lower rooting rates.
- Neglecting water changes: In water propagation, stale water depletes oxygen and encourages bacterial growth that rots stems.
- Moving cuttings too early: Transplanting before roots are 1-2 inches long - or before they resist a gentle tug in soil - usually results in transplant shock and collapse.
Container choice is flexible. Any clean container with drainage works for soil propagation.
Repurposed yogurt pots, solo cups with drainage holes punched in the base, and takeout containers all perform fine. The same drainage principles that keep aloe healthy apply equally to propagation containers.
For broader growing context, the same principles that help you understand plant root health and soil structure apply here. Roots need oxygen as much as moisture - compacted, wet soil prevents both.

Frequently Asked Questions
Most cuttings root within 2–8 weeks. Fast species like pothos or impatiens can show roots in under two weeks, while woody stems like rosemary need the full eight.
Rooting hormone is a powder or gel containing auxins that stimulate root growth. It is not mandatory — many plants root fine without it — but the RHS propagation guide recommends it for woody or slow-rooting species.
Yes, many species root well in water alone. Pothos and philodendron are reliable examples, as confirmed by Penn State Extension. Some species develop stronger roots in soil long-term.
Pothos, philodendron, coleus, mint, basil, impatiens, and tradescantia are among the easiest. Succulents and many woody perennials like lavender also root reliably from stem cuttings with the right timing.
Stem rot from overwatering, wilting from direct sun, and transplanting before roots reach 1–2 inches are the most frequent failures. Clean tools and fresh potting mix prevent most of these issues before they start.
Pin it for your next how to propagate plants from cuttings project.