A drip irrigation system can cut outdoor water use by 30 to 50 percent compared to overhead sprinklers, and you can have one running in a single weekend.
The parts are inexpensive, the tools are basic, and the payoff shows up on your next water bill.
Most failures happen before the first drop flows - wrong emitter flow rates, mismatched tubing sizes, or skipped pressure regulators. Get those decisions right at the start and the rest of the install is straightforward.
This guide walks through every stage: planning your layout, buying the right parts, connecting the system, and fixing the problems that show up after the first test run.
If you're weighing whether drip or overhead watering makes more sense for your beds, the water savings comparison between the two systems is worth reading first.
Whether you're covering a 10-foot raised bed or a 500-square-foot vegetable garden, the core process is the same. Scale the parts list, not the method.
Installing drip irrigation requires a mainline, emitters, pressure regulator, filter, and timer. Plan your layout by zone, match emitter flow to plant type, and test pressure before burying lines.
Most residential setups cost $50–$150 in parts.
How to Install Drip Irrigation?
The install process has six clear stages. Rushing past planning and jumping straight to digging is how you end up with uneven coverage or a pressure drop that leaves half your plants dry.
Remember it later
Planning to try this recipe soon? Save it for a quick find later!
The USU Extension drip guide recommends sketching your yard to scale before buying a single part - zone boundaries, plant locations, and water source all go on paper first. That sketch drives every purchase after it.
Cap the ends of each zone with figure-8 end caps rather than fold-and-clamp closures. They seal more reliably and make seasonal flushing much easier.
Layout and Zoning for Efficiency
A good layout puts the right amount of water at each root zone without overlap or dry gaps. Two layout patterns cover most residential gardens: linear drip lines for rows of vegetables or hedges, and a grid pattern for densely planted beds or groundcover areas.
Linear runs work best when plants sit in single or double rows spaced 12-18 inches apart. Grid layouts space lines 12 inches apart in both directions and work well for raised beds with mixed planting.
The DripWorks planning guide suggests placing emitters no more than 18 inches apart in sandy soil and up to 24 inches apart in clay, since water spreads laterally more in dense soils.
Clay soil spreads water laterally up to 24 inches from an emitter. Sandy soil moves water mostly downward, so you need more emitters per plant to get full root coverage.
| Plant Type | Emitters Per Plant | Flow Rate | Spacing |
|---|---|---|---|
| Tomatoes / peppers | 2 | 1 GPH each | 12 in. from stem |
| Shrubs (3–5 gal.) | 2–3 | 1–2 GPH each | 18 in. from crown |
| Trees (1-inch caliper) | 4–6 | 2 GPH each | 18–24 in. radius |
| Containers / pots | 1 | 0.5 GPH | Center of pot |
| Groundcover / perennials | 1 per sq. ft. | 0.5–1 GPH | 12 in. grid |
Keep each zone under 200 gallons per hour total flow to avoid pressure drop at the far end. Add up all emitter GPH ratings before you finalize zone boundaries - a zone with 40 shrubs at 2 GPH each hits that ceiling fast.
Containers and vegetable beds are best isolated as their own zones because they need more frequent watering than established shrubs. Running them together means either overwatering woody plants or underwatering food crops.
For summer-specific scheduling help, summer garden watering routines give a useful baseline for cycle frequency.
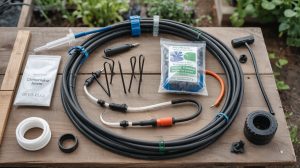
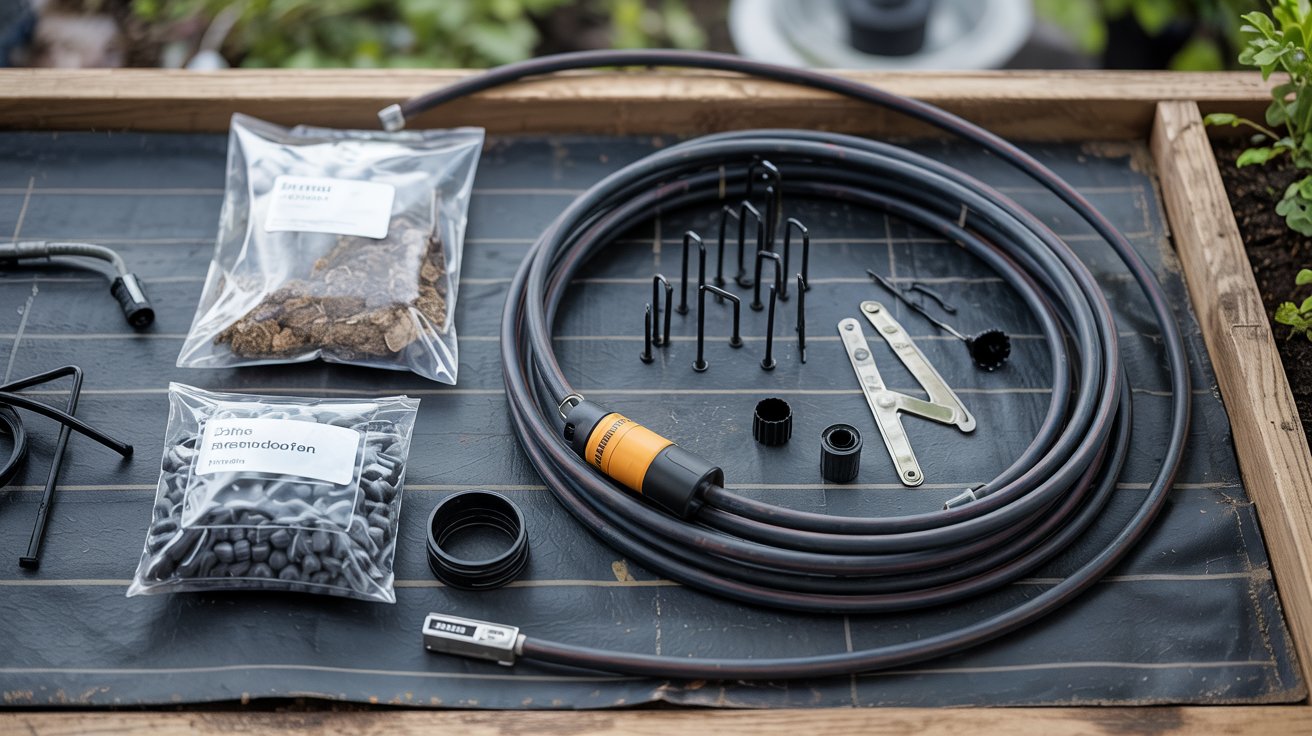
Parts and Tools You'll Need
A basic drip system for a 200-300 square foot garden runs $50 to $150 in parts, depending on timer quality and emitter count.
Buying a pre-boxed kit gets you started, but most kits skip the pressure regulator or include only one emitter flow rate - neither is ideal.
If you want to compare what's included across boxed options before buying individual parts, checking the top-rated drip kits side by side saves time.
The UC ANR guide on home drip components recommends always installing a filter upstream of the pressure regulator to prevent emitter clogging from sediment.
| Component | What It Does | Approx. Cost |
|---|---|---|
| ½-in. mainline tubing (50 ft.) | Carries water from source to zones | $8–$15 |
| Pressure regulator (25–30 PSI) | Reduces house pressure to drip range | $8–$12 |
| Y-filter (150-mesh) | Screens sediment before emitters | $6–$10 |
| Backflow preventer | Keeps irrigation water out of home supply | $5–$10 |
| Digital timer (single zone) | Automates run cycles | $20–$45 |
| Emitters (1 GPH, pack of 25) | Deliver water at root zone | $6–$10 |
| ¼-in. distribution tubing (25 ft.) | Runs from mainline to each emitter | $4–$8 |
| Stakes, end caps, fittings | Secure and close lines | $5–$10 |
Buy a 150-mesh filter, not the common 75-mesh. Finer screens catch the particles that clog 0.5 and 1 GPH emitters, which are the sizes most home gardens use.
Tools you already own will cover most of this job. You need a hole punch tool (specific to ½-inch poly tubing), a utility knife, and a pair of pliers.
The hole punch is the one specialty item - a nail or drill bit leaves irregular holes that leak.
If your outdoor faucet already has a soaker hose attached, you can compare systems directly — the soaker hose vs. drip breakdown covers where each works better before you commit to parts.
Common Pitfalls and Troubleshooting
Most drip problems trace back to three root causes: mismatched flow rates across a zone, missing pressure regulation, and clogged emitters from skipped filtration. Fix these at install and you'll rarely troubleshoot again.
Hunter Irrigation's drip design guide notes that running drip tubing without a pressure regulator is the single most common cause of emitter blowouts and barbed fitting failures. Standard household pressure of 60-80 PSI will pop barbed connections right out of polyethylene tubing.
- Use a 150-mesh inline filter and clean it every 60 days during the season.
- Match all emitters in one zone to the same GPH rating so every plant gets equal pressure.
- Flush lines for 60 seconds at the start of each season to clear debris.
- Check emitters monthly - push a pin through a clogged emitter opening to clear mineral deposits.
- Don't mix 0.5 GPH and 2 GPH emitters on the same zone - pressure drops unevenly.
- Don't skip the pressure regulator, even on low-pressure municipal supplies.
- Don't bury lines before testing - a leaking barb fitting under 3 inches of mulch is hard to find.
- Don't leave poly tubing exposed over winter in freeze zones - drain and store it.
Gophers and voles chew through ½-inch polyethylene tubing underground. If you're in rodent country, run mainlines through conduit or use a rigid poly alternative and keep lines at surface level under mulch.
For a full maintenance schedule - including end-of-season blowouts and spring startups - the tool and equipment maintenance routine pairs well with drip system upkeep.
Also, if you're considering what the full cost looks like if you ever upgrade to an in-ground sprinkler system, the sprinkler installation cost breakdown shows what that step-up involves.
Frequently Asked Questions
Yes. A basic single-zone system needs no permits and only basic tools. Most homeowners complete a 200-square-foot bed in 3–4 hours with no plumbing experience.
A complete kit needs a backflow preventer, filter, pressure regulator, timer, mainline tubing, emitters, and end caps. Many retail kits omit the pressure regulator — buy one separately if needed.
Yes. Standard household water pressure runs 40–80 PSI, but drip systems operate at 25–30 PSI. Without a regulator, barbed fittings blow out and emitters fail prematurely.
Drip delivers water directly to the root zone with no overspray or surface evaporation. According to irrigation BMP guidelines, drip systems apply water at 90%+ efficiency vs. 50–70% for sprinklers.
Vegetables typically need 20–30 minutes daily in peak summer heat; established shrubs need 45–60 minutes every 2–3 days. Adjust based on soil type and your local evapotranspiration rate.
Pin it for your next how to set up drip irrigation project.