Start your pumpkin seeds in late spring, and you'll be hauling orange fruits out of your backyard patch well before Halloween. Standard varieties need 90-120 days from seed to harvest, which means your planting window is tight but very manageable for most North American backyards.
Most failed pumpkin patches share three problems: crowded plants, inconsistent watering, and missed pollination windows.
This guide solves all three. You'll also find a pumpkin variety selection framework and a dedicated giant-pumpkin pathway if you want to go big.
We'll cover everything from soil pH to post-harvest storage in a straightforward, season-by-season order so you can follow along without backtracking.
Pumpkins need full sun, well-drained soil at pH 6.0–6.5, and consistent moisture from planting to harvest. Standard varieties mature in 90–120 days.
Space vines generously — at least 24–36 inches between plants — and never let the soil dry out during fruit set.
According to UMN Extension, seeds should go ¾ inch deep with plants spaced 24–36 inches apart. Don't transplant until soil hits 65°F — cold soil stalls germination for weeks.
Pumpkin Varieties: Which to Grow
Choosing the right variety before you buy seeds saves space, time, and frustration. A carving pumpkin left to sprawl across a small yard will crowd out everything else, while a compact pie pumpkin fits neatly in a raised bed.
Remember it later
Planning to try this recipe soon? Save it for a quick find later!
The three main categories - pie types, carving types, and giants - each have distinct space and time requirements. According to OSU Horticulture, mammoth types like Cucurbita maxima 'Atlantic Giant' need final spacings of 3-4 feet between rows.
| Variety | Days to Maturity | Typical Size | Best Use |
|---|---|---|---|
| Sugar Pie | 100 days | 6–8 lbs | Cooking & baking |
| Howden | 115 days | 15–25 lbs | Carving |
| Jack Be Little | 95 days | Under 1 lb | Ornamental |
| Atlantic Giant | 120–130 days | 200–400+ lbs | Giant competition |
| Cinderella (Rouge vif d'Étampes) | 110 days | 15–35 lbs | Display & cooking |
UMN Extension notes that most varieties mature in 90-110 days, though warmer regions can shift that window by 1-2 weeks in either direction.
If you're in a short-season climate (zones 3–4), choose varieties under 100 days like Sugar Pie or Baby Pam. Atlantic Giant needs at least 120 frost-free days — marginal in zones 3–4 without season extenders like black plastic mulch.
Giant-pumpkin growers need to commit serious real estate. A single Atlantic Giant plant requires a minimum of 400 square feet, and during peak summer growth it can put on several pounds per day, according to UMN giant pumpkin guidance.
If you want to add color alongside your pumpkins, choose compact flowers that won't compete for root space. Keep fruiting and ornamental plants in separate beds whenever possible.
Soil, Sun, and Timing
Pumpkins are heavy feeders that demand well-drained, fertile soil and a minimum of six hours of direct sun per day. Shade slows vine growth, reduces pollinator activity, and leads to misshapen fruit.
Soil preparation is the single step most backyard growers skip. Skipping it costs yield every time.
Lay black plastic mulch over prepared beds one week before planting to pre-warm soil by 5–8°F. This shortens the wait in cooler climates and gives seeds a faster start once you cut planting holes.
Timing your sow date around your last frost date is straightforward: count backward 90-120 days from your target harvest date, then check that the soil will be warm enough. For most of the US Midwest and Northeast, that puts direct sowing in late May to early June.
For backyard growers curious about other root vegetables that share similar timing, carrot growing follows a comparable cool-to-warm soil transition logic.
If your season is short, start seeds indoors 2-3 weeks before your last frost date in 4-inch biodegradable pots. Pumpkin roots dislike disturbance, so biodegradable pots that go directly into the ground reduce transplant shock significantly.

Planting and Early Care
Whether you direct sow or transplant, the first two weeks after planting set the foundation for everything that follows. Consistent moisture and good sun access during this window make a visible difference by week four.
Plant 2-3 seeds per hill, 1-1.5 inches deep, with hills spaced 2-5 feet apart within rows and 4-8 feet between rows, per MSU Extension recommendations. Once seedlings reach 3-4 inches tall, thin to the single strongest plant per hill.
Transplant seedlings only when they show 2–3 true leaves and soil is at 65°F or above. Younger seedlings moved too early go into growth stall. Harden off transplants over 5–7 days by setting them outside in shade, gradually increasing sun exposure.
Water at the base of plants, not over leaves. Wet foliage invites powdery mildew, which can cut your season short by 2-3 weeks.
Apply 2-3 inches of straw mulch around plants after thinning to hold moisture and suppress weeds without smothering seedlings.
For gardeners who want to complement their vegetable patch, growing perennial flowers nearby can increase pollinator traffic around your pumpkin blossoms, which directly improves fruit set.
Pests, Diseases, and Troubleshooting
Pumpkins face a predictable roster of threats every season. Knowing what to look for - and when - makes early intervention straightforward rather than reactive.
The three most damaging insects are squash vine borers, cucumber beetles, and squash bugs. Vine borers tunnel into stems near the base in midsummer; cucumber beetles arrive early and spread bacterial wilt; squash bugs cluster under leaves and drain plant sap.
- Scout weekly: Flip leaves and check stem bases starting at transplant. Early detection cuts losses dramatically.
- Use row covers early: Floating row cover blocks cucumber beetles and squash bugs until female flowers open for pollination.
- Water at the root zone: Drip irrigation or soaker hoses keep foliage dry and reduce powdery mildew pressure.
- Remove crop debris: Pull spent vines and fruit at season's end to reduce overwintering pest and disease populations.
- Don't overhead water: Wet leaves daily almost guarantees fungal issues similar to those seen in woody plants - powdery mildew spreads fast in humid conditions.
- Don't apply fertilizer to leaves: Leaf contact with fertilizer burns tissue and creates entry points for disease.
- Don't leave damaged fruit on the vine: Rotting pumpkins attract pests and spread fungal spores to healthy fruit nearby.
- Don't skip labeled treatments: When pest pressure is high, apply labeled insecticides promptly - delay costs you the plant.
Powdery mildew - a white, dusty coating on leaves - is the most common disease issue, per UMN Extension. It won't kill the plant immediately but weakens it enough to cut fruit size by 20-30% in severe cases.
Squash vine borers are hardest to catch early because damage happens inside the stem. Watch for sawdust-like frass at the base of vines in July. Once inside, the borer is difficult to remove — prevention with row cover before egg-laying is far more effective than treatment after.
For an integrated pest management (IPM) approach, MSU Extension recommends combining scouting, bed hygiene, and resistant varieties before reaching for any chemical treatment. Keep a simple weekly log of what you see - it makes season-to-season improvement much easier.
Harvest, Curing, and Storage
Knowing when to cut a pumpkin off the vine matters as much as how you grew it. A fruit harvested too early or stored incorrectly can rot within weeks.
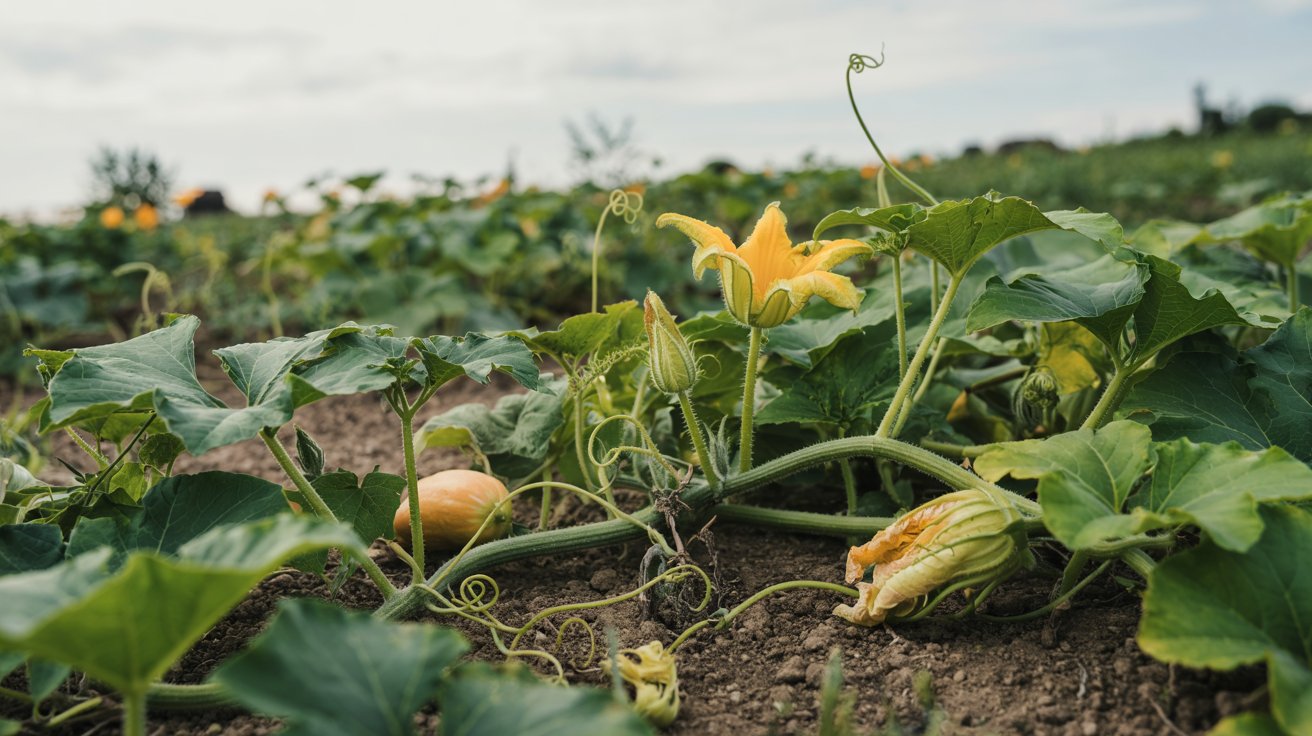
Look for these signs of maturity: the skin resists puncture from a fingernail, the vine near the fruit has started to dry and brown, and the color has deepened fully across the entire surface.
Cut with 3-4 inches of stem intact - stemless pumpkins rot at the top within days.
Harvest before the first hard frost, not after. A light frost won't destroy a pumpkin, but a hard freeze softens the skin and invites rot. If frost is forecast and your pumpkins aren't quite ready, bring them inside — they'll finish ripening in a warm room.
Field-cure pumpkins in warm, dry weather for 10-14 days at 80-85°F to harden the skin. After curing, move them to a cool, dry location.
UMN Extension recommends storage at around 55°F with 50-75% humidity. A basement shelf or unheated spare room often works well.
Handle harvested fruit gently - a single bruise becomes a soft spot and then a rot zone within 2-3 weeks. Store pumpkins in a single layer without stacking, and check them every week or two for soft areas.
If you enjoy growing other plants that reward careful post-harvest handling, basil harvesting technique follows a similarly methodical approach to extending shelf life.
Region Timing and Seasonal Adjustments
Your planting date should work backward from your first fall frost, not forward from a calendar date.
Count 110 days back from your average first frost, then subtract another week if you're in a warmer region - OSU horticulture research shows warmer climates can adjust harvest timing by 10-15 days earlier.
In zones 3-4, start indoors and use black plastic mulch to extend the season. In zones 8-9, a second planting in July can produce a fresh fall harvest.
Gardeners who also grow full-sun plants in hot climates will recognize the same heat-management principles apply to pumpkin beds in southern regions.
For short-season growers, choosing a variety under 100 days and starting indoors 3 weeks early can mean the difference between a full harvest and a patch of green pumpkins frozen on the vine.
Longer-season growers in zones 6-7 have the most flexibility and can sow directly outdoors in late May with confidence.
Backyard growers interested in other plants with nuanced timing needs - like understanding when peonies bloom or matching rose cycles to your region - will find the same last-frost anchoring strategy applies across most garden planning.
And if you're wondering how indoor plants fit your garden rhythm, easy-care houseplants can fill the gap during the cold months between pumpkin seasons.
Frequently Asked Questions
Most standard varieties mature in 90–110 days. Giant varieties like Atlantic Giant need 120–130 days from transplant to harvest-ready fruit.
Only compact bush varieties work in containers — you'll need at least a 15–20 gallon pot. Standard vining types need too much root and vine space for container culture.
Yes. Giant pumpkin growers typically use high-phosphorus fertilizer early, then switch to high-potassium blends during fruit development. Soil organic matter above 5% is common in competitive growing patches.
Water deeply once or twice per week, delivering about 1 inch total. Increase to every 3 days during fruit set in hot weather — that's when consistent moisture matters most for size.
Store cured pumpkins at 55°F with 50–75% relative humidity in a single layer. Avoid concrete floors — place them on cardboard or wooden slats to prevent bottom rot.
Pin it for your next how to grow pumpkins in your backyard project.