Aloe vera is one of those plants that rewards neglect more than attention.
Give it a bright window, fast-draining soil, and water only when the soil is truly dry, and it will reward you with steady growth and a steady supply of offsets to share or repot.
Most first-time aloe growers kill the plant with kindness - too much water, too little light, and a pot with no drainage hole. Getting those three fundamentals right solves about 80% of the problems people run into.
This guide covers everything you need: the right container setup, a watering schedule tied to soil feel rather than the calendar, a step-by-step offset propagation method, and a seasonal care plan so you know what to adjust in winter versus summer.
Aloe vera also moves between indoors and outdoors well, which makes it more flexible than most succulents. You can manage outdoor summer placement and bring it back in before the first frost without missing a beat.
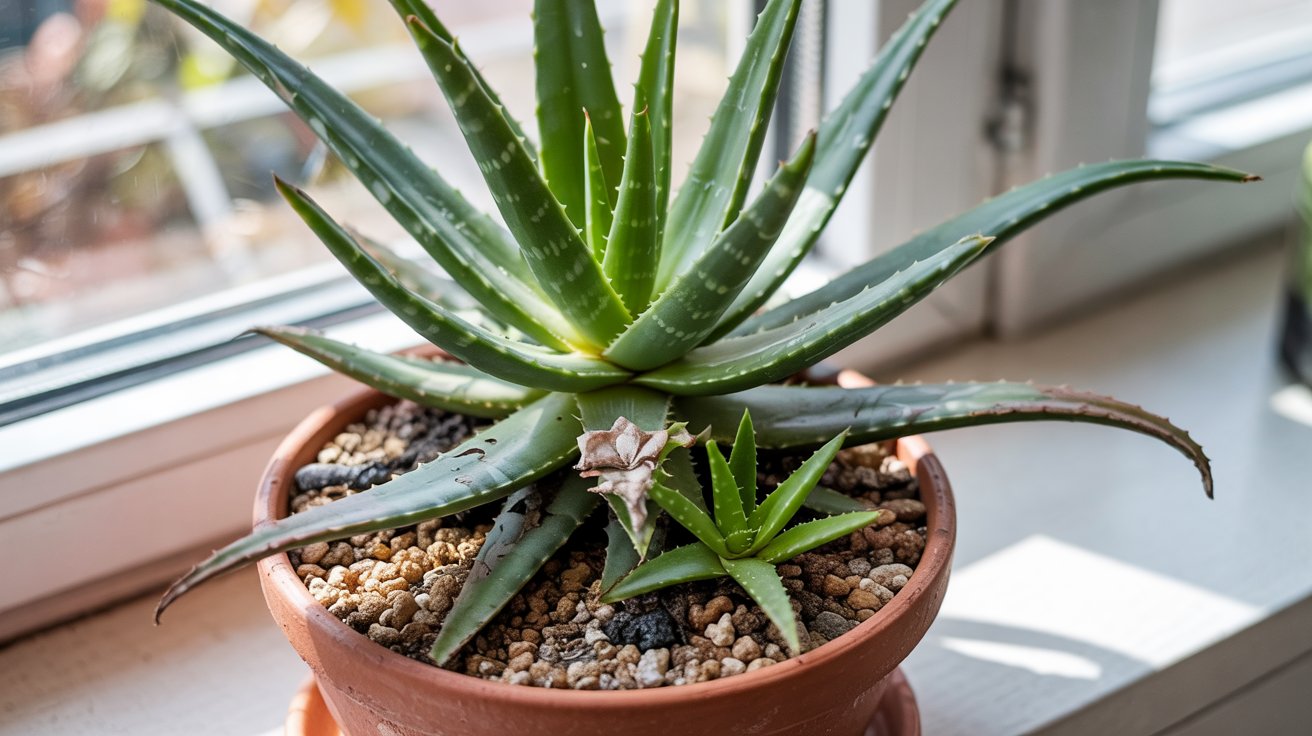
A stemless succulent native to the Arabian Peninsula, Aloe vera stores water in thick, fleshy leaves arranged in a rosette. It handles drought far better than overwatering, produces offsets (pups) freely, and adapts to both windowsill and outdoor garden life in frost-free climates.
According to the UF/IFAS extension guide, Aloe vera is drought tolerant and should only be watered when the top inch of soil is dry to the touch.
The RHS plant profile confirms that indoors, the plant prefers bright, indirect light and a well-drained potting mix, since direct sun can scorch leaves in a south-facing window without acclimatization.
Aloe vera needs bright light, fast-draining soil, and infrequent watering to stay healthy. It propagates easily from offsets (pups), prefers USDA zones 8–11 outdoors, and enters a slow winter period that requires cutting back water significantly.
Growing Environment for Aloe Vera
Aloe vera is native to arid, semi-tropical regions, which means it expects heat, strong light, and soil that never stays wet for long. Outdoors, it performs best in USDA hardiness zones 8-11, where winter temperatures stay above 40°F (4°C).
Remember it later
Planning to try this recipe soon? Save it for a quick find later!
In cooler zones, it works as a container plant brought inside before frost.
Light is the single biggest variable between a thriving aloe and a stretched, pale one. Indoors, a south- or east-facing window delivering at least 6 hours of bright light per day keeps the plant compact and healthy.
If you're moving a pot from indoors to a sunny patio, acclimate it over 1-2 weeks by starting in bright shade to prevent leaf scorch.
Soil composition matters as much as sun exposure. The RHS recommends full sun and very well-drained growing media - a commercial cactus or succulent mix works well, or you can blend standard potting soil with 50% coarse perlite.
Aloe vera sits comfortably alongside other water-smart succulent plantings in the landscape. Temperature is a hard limit: anything below 32°F (0°C) kills the roots, so even in zone 8, container plants should move under cover on frost-warning nights.
Outdoor aloes benefit from afternoon shade in climates above zone 9, where afternoon temperatures regularly exceed 95°F. Even a drought-tolerant plant can stress under relentless summer heat combined with reflected light from pavement or walls.
The UF/IFAS aloe guide notes that well-drained media and no standing water are non-negotiable regardless of zone.
Aloe Vera Care Essentials
A reliable aloe care routine has four pillars: watering tied to soil feel, a fast-draining pot, the right soil mix, and almost no fertilizer. Get these right and the plant largely takes care of itself.
Struggle with even one, and problems compound quickly.
Watering is where most growers go wrong. SDSU Extension recommends watering only when the soil surface is completely dry - then watering thoroughly and letting it drain fully.
In practice, that's roughly every 2-3 weeks in summer and once a month in winter. Never let the pot sit in a saucer of standing water, as root rot sets in fast.
| Care Factor | Recommendation | Common Mistake |
|---|---|---|
| Watering | When top inch of soil is fully dry | Watering on a fixed weekly schedule |
| Soil | Cactus/succulent mix or 50% perlite blend | Standard potting soil alone (holds too much moisture) |
| Pot | Terra cotta with drainage hole, 1–2 inches wider than root ball | Oversized pot — excess soil stays wet too long |
| Light | 6+ hours of bright light; indirect indoors | Low-light spot causes etiolation (stretching) |
| Fertilizer | Diluted balanced liquid feed once in spring, once in summer | Monthly feeding causes salt buildup and leaf tip burn |
| Repotting | Every 2–3 years or when roots circle the pot | Repotting into a pot much larger than the root ball |
Pot choice matters more than most guides admit. Terra cotta is ideal because it wicks moisture away from the roots between waterings.
Choose a pot only 1-2 inches wider than the root ball - a much larger pot holds excess wet soil with no roots to absorb it, which is a direct path to rot.
Fertilizer requirements are minimal. The plant grows slowly and stores its own nutrients in its leaves.
A single application of diluted, balanced liquid fertilizer (10-40-10) in spring and another in early summer is plenty. Feeding more often than that causes salt accumulation, which shows as brown leaf tips - a symptom often mistaken for underwatering.
Brown, mushy leaf bases almost always mean root rot from overwatering, not underwatering. Pull the plant from its pot and check the roots. Trim any black or brown roots with clean scissors and repot in fresh, dry cactus mix before watering again.
If you enjoy growing other low-maintenance houseplants, the same well-draining approach that works for aloe also applies when you grow snake plants with minimal care. Both handle neglect far better than attention.

Propagating Aloe Vera from Offsets
Aloe vera is one of the most propagation-friendly houseplants you can grow. A healthy, established plant produces offsets - also called pups - from its base, often several per growing season.
These pups are already genetically identical to the mother plant and root quickly when handled correctly.
Penn State Extension notes that many aloes produce pups that can be removed and transplanted directly. The RHS propagation guidance specifies spring or early summer as the best window, when the plant is entering active growth and offsets root fastest.
Leaf-cutting propagation does not reliably work for Aloe vera — cuttings rarely develop roots. Stick with offsets for consistent results every time.
Propagating in spring means the new plant has a full growing season to root and establish before winter. You can start other plants from divisions on a similar late-spring timeline for a coordinated propagation window across the garden.
Seasonal Care and Growth Timeline
Aloe vera follows a predictable annual rhythm: active growth in spring and summer, slow growth in fall, and near-dormancy in winter. Matching your care to that rhythm prevents the two most common errors - overwatering in winter and under-lighting in summer.
During winter dormancy, cut watering to once every 4-6 weeks. The UF/IFAS guide confirms that indoor aloes need bright light year-round, but the plant's water demand drops significantly when growth slows.
Moving the pot closer to the window in November compensates for lower light levels in shorter days.
Repotting fits best into the early spring window, just as new growth resumes. This is also when offsets are easiest to separate, so you can repot the mother plant and propagate pups in one session.
Repot into a container only slightly larger than the current root ball to avoid excess wet soil.
Gardeners World's aloe vera care guide recommends a peat-free cactus mix and careful attention to sun exposure as the season changes. In summer, outdoor plants in zone 8-9 can handle morning full sun but benefit from light afternoon shade during heat waves above 95°F.
Comparing aloe's seasonal needs to other low-light-tolerant houseplants is useful for planning your indoor setup. If you already follow a year-round plant care calendar, slotting aloe's reduced winter watering into that schedule keeps it easy to track.
Plants like the monstera need consistent moisture year-round - aloe is the opposite, and keeping that contrast in mind prevents accidental overwatering in the colder months.
Mark your calendar for the second week of March to repot, separate pups, and move the plant to its brightest window. That single annual session handles most of the year's maintenance in one go.
For growers interested in pairing aloe with other easy-care houseplants, it works well alongside the low-maintenance peace lily, though the two have opposite watering needs - keep them on separate schedules. If you want a broader comparison of houseplants that suit a bright window, fiddle-leaf fig requirements sit on the opposite end of the care spectrum from aloe's forgiving nature.
For outdoor full-sun placement ideas, sun-loving border plants can fill in the gaps around an aloe container bed. And if you're building a low-effort indoor plant collection, propagating spider plants from runners follows a similarly simple offset-style method.
Frequently Asked Questions
Separate offsets (pups) at least 3 inches tall in spring. Let the cut end callus for 24–48 hours, then pot into cactus mix and wait 5–7 days before watering.
Water every 2–3 weeks in summer when the top inch of soil is dry. In winter dormancy, reduce to once every 4–6 weeks.
A commercial cactus or succulent mix works best. Alternatively, blend standard potting soil with 50% coarse perlite to improve drainage and prevent root rot.
Yes. Place it in a south- or east-facing window with at least 6 hours of bright light daily. It grows more slowly indoors than outdoors but remains healthy with proper care.
Yellow, mushy leaves signal overwatering; brown, dry leaf tips usually indicate salt buildup from over-fertilizing. Reduce feeding to twice yearly and let soil dry completely between waterings.
Pin it for your next how to grow and care for aloe vera project.