A well-built outdoor kitchen can extend your cooking and entertaining season by months, but most projects stall because homeowners start shopping for appliances before they've settled on a layout or confirmed what permits their county requires. This guide fixes that.
The four-phase roadmap here - planning and layout, budget and materials, utilities and permits, then the actual build - is designed to prevent expensive do-overs.
The direct answer: a DIY outdoor kitchen starts with locking in your layout zone, then follows a structured sequence through materials, utility rough-ins, and construction that any motivated homeowner can complete in a single season.
Oklahoma State University Extension notes that outdoor room planning works best when functional relationships between cooking, dining, and lounging zones are decided before any materials are purchased.
Building a DIY outdoor kitchen requires four phases: layout planning, budgeting and materials selection, utility and permit work, and construction. Costs range from $3,000 for a basic grill island to $30,000+ for a full premium setup.
Choosing your layout and locking down utility needs first prevents the most common and costly mistakes.
Planning Your Outdoor Kitchen Layout
Layout is the single decision that controls every cost and trade downstream. Get it wrong and you're rerouting gas lines or rebuilding a countertop run - get it right and the rest of the project snaps into place.
Remember it later
Planning to try this recipe soon? Save it for a quick find later!
UF/IFAS Extension's outdoor living space guidance recommends treating your kitchen as one node in a larger site plan, with clear traffic paths between the cooking zone, dining area, and interior house access.
The Four Core Layout Shapes
Most outdoor kitchens fall into one of four configurations, each suited to a different yard size and use pattern.
- Linear (single-run): One straight counter run along a wall or fence. Best for narrow patios under 12 feet wide and budgets under $8,000.
- L-shape: Two runs meeting at a corner, separating the cooking zone from prep and storage. Works well on patios 14 feet or wider and supports natural traffic flow around the cooking end.
- U-shape: Three runs forming a working triangle, maximizing counter space and zone separation. Requires at least a 16×16-foot footprint and suits frequent entertainers.
- Island (freestanding): A standalone counter, often with seating on the guest-facing side. Combines well with a modular approach and works in open patios where no walls are available to anchor a run.
Defining Your Work Zones
Every functional outdoor kitchen needs at least three zones: cooking, prep, and storage. A fourth - cleaning, meaning a sink with drainage - adds significant utility but also the most permit and plumbing complexity.
Keep the cooking zone downwind of your dining area so smoke doesn't blow toward seated guests. Place prep space immediately adjacent to the grill, not across a traffic lane.
Orient your grill so the cook faces the party, not a wall or fence. A 90-degree offset from the house wall achieves this in most L-shape and island builds without sacrificing counter space.
Layout Decision Checklist
Work through these questions before committing to a configuration. Each answer narrows your layout and materials list.
- Available footprint: Measure your patio or intended build area - length, width, and clearance from the house wall.
- Primary use: Daily grilling for a family of four requires less prep space than weekend parties for 20.
- Appliance count: Grill only, or grill plus side burner, fridge, and sink? Each appliance needs a rough-in location.
- Built-in vs. modular: A built-in grill island costs more upfront but looks cleaner; modular stainless units run cheaper and relocate easily.
- Shade and seasonal use: Southern exposures without overhead cover become unusable in summer afternoons - plan for a pergola or sail shade if needed.
- Traffic flow: Mark the path from your back door to the grill and to the dining table. No layout should put the cook in a cross-traffic bottleneck.
- Utility entry points: Locate the nearest gas stub-out, outdoor GFCI outlet, and hose bib - these constrain where the kitchen can practically sit.
- Long-term plan: If you're also weighing pool or patio additions, plan kitchen clearance now to avoid conflicts later.
Budget, Plans, and Materials
Once layout is locked, costs become predictable. The three main budget tiers reflect appliance count, countertop material, and structural approach - not just square footage.
Before pulling any permits or ordering stone, sketch your plan on paper or use a free tool like the NKBA's online planner. A dimensioned sketch with appliance locations, utility entry points, and counter heights is the minimum needed to get accurate material quotes.
Cost Tiers at a Glance
| Tier | What's Included | Estimated DIY Cost |
|---|---|---|
| Basic | Grill island, 6-ft counter, no utilities | $3,000–$6,000 |
| Mid-Range | Grill, side burner, mini-fridge, sink, 10–14 ft counter | $8,000–$15,000 |
| Premium | Full appliance suite, stone counters, pergola, full plumbing/gas | $18,000–$30,000+ |
Labor is the biggest variable. A DIYer who handles framing, tile, and countertop installation personally can cut contractor costs by 40-60 percent compared to a full professional build.
Structural Materials Comparison
The frame material determines weather durability, weight, and total project cost more than any single decision outside appliance choice.
- Concrete masonry units (CMU block): The most durable and fire-safe option. A standard 8×8×16-inch CMU block runs $2-$4 each, and a typical island uses 80-120 blocks. Requires mortar work but holds up indefinitely.
- Steel stud framing with cement board: Faster to build than CMU, lighter, and easier to modify. Cover with fiber cement backer board before tiling. Total framing materials run $400-$900 for a mid-range island.
- Natural stone or stone veneer: Applied over CMU or cement board as a finish layer. Stone veneer runs $8-$20 per square foot installed and provides the highest visual impact per dollar.
- Stainless steel modular cabinets: No framing required - units arrive pre-built. Higher upfront per-cabinet cost ($300-$1,200 per module) but zero masonry skill needed.
For countertops, granite and concrete are the most weather-resistant hard surfaces. Avoid ceramic tile on horizontal outdoor surfaces in freeze-thaw climates - grout absorbs moisture and cracks by the second winter.
The USDA reminds outdoor cooks that food safety outdoors depends on having dedicated prep surfaces and a handwashing station. Plan a cold-water-only spigot near the prep zone even if a full sink isn't in the budget.
Bill of Materials Checklist
Deciding between charcoal or gas at this stage directly affects your gas rough-in budget - a gas grill requires a licensed line extension while charcoal needs only a fireproof base and proper clearance.
Utilities, Permits, and Weatherization
Utility planning is where most DIY outdoor kitchens get delayed - or worse, fail inspection. Rough-in locations must be decided before framing is complete, not after.
Gas lines feeding a built-in grill require a licensed plumber or gas fitter in most jurisdictions. Running an extension from an existing stub-out is typically a half-day job for a pro, but pulling it yourself without a license can void your homeowner's insurance.
The ASLA's outdoor kitchen design guide identifies utility coordination as the top source of costly project revisions.
What Each Utility Requires?
- Natural gas or propane: Requires a pressure-tested line, shutoff within 6 feet of the appliance, and in most states a licensed installer for new connections.
- Electrical (outlets and lighting): All outdoor receptacles must be GFCI-protected and weatherproof-rated. Run a dedicated 20-amp circuit if you're adding a refrigerator.
- Water (sink or spigot): Tie into an existing outdoor water line with a tee fitting. Add a proper freeze-proof shutoff if you're in a climate with hard freezes.
- Drainage: A simple dry-well or slope-to-grade drain prevents standing water under the sink cabinet. Plan the drain path before pouring any concrete.
Many municipalities require a building permit for any permanent outdoor structure with gas, electrical, or plumbing connections. Check your local building department before framing starts — unpermitted gas work can create serious liability during a home sale.
For weatherproofing, seal all countertop penetrations with 100% silicone caulk rated for outdoor use. Use stainless or powder-coated hardware throughout - standard zinc screws rust through in two seasons.
If you're comparing the overall cost of this project against other backyard upgrades, a backyard cost calculator can help you model trade-offs before committing.
Step-by-Step Build Sequence
Follow this sequence exactly. Skipping ahead - especially installing appliances before utilities are roughed in - creates rework that costs more time than the shortcut saves.
Each step has a natural inspection or verification point. Pause and check before moving forward, especially at the framing and utility stages where errors get buried under finish materials.
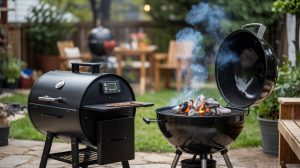
For grill selection at the final install stage, comparing top-rated charcoal grills or reviewing the pellet vs. charcoal trade-offs can sharpen your appliance decision before you commit to a cutout size. If you're also pricing a hot tub alongside this build, the hot tub cost breakdown gives comparable ROI context for combined backyard entertaining upgrades.
Considering whether to add a pool at the same time? Check what a pool actually costs so you can sequence both projects without budget overlap.

Frequently Asked Questions
Lock in your layout footprint and utility entry points first. Changing gas line or drain locations after framing begins typically adds $500–$1,500 in rework costs.
Most jurisdictions require permits for permanent structures with gas, electrical, or plumbing connections. A freestanding grill with no utilities often needs no permit, but always confirm with your local building department first.
CMU block with stone veneer is the most durable structural choice. For countertops, granite and concrete outperform ceramic tile outdoors, especially in climates with freeze-thaw cycles that crack grout joints.
A linear single-run layout fits patios as narrow as 10 feet and keeps costs under $6,000. A compact island with seating on one side works well when no wall is available to anchor a run.
Shut off and drain the water supply line before the first freeze, disconnect and cap the gas flex line, and cover stainless appliances with fitted weatherproof covers rated for outdoor storage. Reseal granite countertops every 12 months.
Pin it for your next how to build a diy outdoor kitchen project.